Wednesday 14 August 2013

Gone but not forgotten.....

It's been so long since I've posted anything on here. The only part of our house that I've really added to this blog is the nursery. It is still the same design with the same furniture and wall colours except for a few minor changes and one big change: a new baby boy, Baby T.

chevron crib sheet
The toy corner. The boys' grandmother made the panda teddy bears.

We had our newest family addition last spring and couldn't be happier with our two boys. Again, we kept the sex of the baby a surprise until the birth so the gender-neutral colour scheme in the nursery worked out well for us. We moved little J into a new room that was designed for him & his personality. I'll post something soon about his new space.

jenny lind chevron
The Jenny Lind crib & toy corner.

monte rocking chair
The rocker corner with the home-made art vignette.
cheap diy art
The print made with markers.

cheap diy art
The 80's inspired paint splatter art.
 
I just did some small changes to get the nursery ready for the new baby. First was the artwork. I didn't want to spend much on nursery artwork because I'm sure in 6-12 months I'll want to replace it again. I just used materials/supplies I already had on hand. I thought the little animal prints were still cute and the floral was cute without being too feminine (and also thinking I had 50% chance of a baby girl to use the space). I wanted to use different techniques and mediums for each piece, which sounds like I know what I'm talking about but I created the most basic kind of artwork possible. One thing I did was use markers on marker paper to create a multicolour diamond pattern. Another technique was taking my paint brush and flicking various colours of paint specks onto card stock (idea via paint splatter patterns from the 1980's). I also used a stamp & acrylic paint to make a polka dot pattern. Above the crib I used acrylics on heavy watercolor paper for the abstract. It didn't cost me anything since I had all the supplies on hand already but it did take some time. Each project was 1-2 hours. In the end it was free art that I won't feel bad about replacing. We also purchased a commemorative birth certificate for baby T (we bought one for J when he was born too). The artwork is of sea lions in the ocean which reminds us of the area we live in. We can hear sea lions barking throughout the year at a marina down the road from our home. I was pleasantly surprised at the bright green & blue-grey colours and sketching details in the rendering once we received it.

nursery art
The art made with acrylic paint & a potato stamp.
nursery art
The abstract made with opaque acrylics on 90lb pressed paper.
green wall nursery
The rocker corner.
nursery change table
The change table...the busiest area of this space.
 
The vintage accordion lamp was my late uncle's. For as long as I can remember it was always by his bedside (he was unfortunately a quadriplegic). I sprayed the metal shade white on the inside and a royal blue on the outside. It's great for the change table and also a nice reading lamp for story time on the rocking chair. It makes me think of my uncle often which I like. I also added an inexpensive woven wicker ceiling fixture from Ikea. It casts a nice warm glow in the space.

change pad hooks
The hooks & hanging baskets above the change pad are so practical....they get piled with things everyday (wash cloths, bibs, etc...).
woven ceiling shade
The ceiling light fixture has a really warm glow when turned on (it was hard to take a photo of...a photographer, I'm not). Nice, soft lighting for little eyes especially at night.
green nursery
The doorway to the nursery.
baby booties boots
The shelf behind the doorway is only a few inches deep but is the perfect storage space for little booties & shoes.
baby booties boots
I love little baby booties & shoes...it might be becoming an 'issue'.
 
I really didn't need anything for the new baby since I was so prepared for our first. We didn't know what we were having with J, so I bought everything neutral - clothing, bedding, accessories, etc...It is nice to get a few new things though. I added a new grey chevron crib sheet (adds just enough pattern to the space), a few little outfits and a new white change pad cover. The light fixtures & other little changes made the space feel ready for new baby.

teddy bear wagon
A wagon filled with books & teddy bears.
merry thought teddy bear
This teddy bear was my husbands when he was wee.
 
Little J loves coming into the nursery to chatter & play while I change or rock the baby. He also loves his new room but not as much as he loves the new 'bebe'.

nursery change table shelf
The shelf above the change pad holds all the changing accessories & knick-knacks.

vintage kewpie doll
A vintage porcelain kewpie doll that was always in my Mom's room as a little girl....mine too.

baby moccasins
Moccasins made on a reserve in Saskatchewan...these were also little J's. I've declared them to be a family heirloom...I'm very sentimental.


Friday 10 February 2012

Our Nursery, what it will be....

Photobucket Pictures, Images and Photos

The nursery design, as it is currently,is my short term 'lets do this as inexpensively as possible' fix. Besides the paint on the walls, I didn't address any of the existing finishes in the space. At some point we will replace the grey broadloom with hardwood flooring. I've thought about many different species of wood floors to install but have decided that we'll put a black walnut plank flooring with a clear finish throughout the house, including all bedrooms & the nursery. I like black walnut because it's a timeless hardwood. It has a balanced variation of warm & cool tones throughout the wood grain.

Photobucket Pictures, Images and Photos
via

A wool or cotton area rug will be needed so that little feet and little bums have something soft & cushiony to plop down on. The area rug should be graphic/patterned, colorful and gender neutral...something along the lines of the following samples (although I know my husband would object to the pink in some of them):

Photobucket Pictures, Images and Photos
via

I 'love' this Dash & Albert rug but sadly it's out of our price range for the nursery & the husband might find this too feminine.

Photobucket Pictures, Images and Photos
via

This is a gorgeous limited edition rug by Malene B. Again out of our price range & maybe a tad too much pink but I love the strong colours & geometry.

Photobucket Pictures, Images and Photos
via

This is definitely more 'boyish' & affordable. I like how the linear stripes take on a free form line at one end. It reminds of melting crayons for some reason.

Photobucket Pictures, Images and Photos
via

This Ikea rug is definitely in our price range. I like the variation of colours and the square shape is more suitable to the space. I'm not crazy about the binding edge but it's colourful, wool fibre & affordable.

Another finishing detail to be addressed is the door, window & floor trim. We currently have the same basic 2" builder trim on all the door frames, window casings and baseboards. It is plain, uninteresting, and boring. Changing the trim details will make a huge impact in the space. Right now I'm thinking that I'd like to add trim detailing that is something similar to this:

Photobucket Pictures, Images and Photos
Feldman Architecture via

I'm using the above photo to reference only the door trim & height of the baseboard, ignore the chair rail & wainscot.

Photobucket Pictures, Images and Photos
Feldman Architecture via

The above photo is only in reference to the window casings.

We also want to eventually replace all the doors in our home. There's no disguising the faux recessed paneled doors. They scream basic builder grade. I'm still undecided on 'the' door style but am leaning more towards a single recessed panel/shaker style door in a white paint finish. No faux wood grain in pressboard, just a solid wood door with a properly constructed recessed panel. And no ogee edges or trim detail around the recess! Just simple clean lines.

Photobucket Pictures, Images and Photos
via

The ceilings throughout our upper level of the house are a huge peeve of mine. They're all a spray texture finish, not as heavy as a popcorn ceiling but not flattened out or a fine texture either. They're somewhere in between and awful! Of course the nursery is one of the lucky rooms to have this ceiling finish. My resolution for all these ceilings is not to scrape the textured finish off (too messy & I don't want to live through that) but install +/ 3" wood planks with a white paint finish over them. It will add a subtle texture throughout the house and allow me to change current lighting locations without having to do any drywall patching. The wood plank ceilings will be painted white & not white washed, stained or left natural (there will be enough wood grain pattern from the black walnut floors so the ceilings do not need to compete with that). The painted wood finish will be similar to the following image but on a flat ceiling plane.

Photobucket Pictures, Images and Photos
via

I've always loved Le Klint light fixtures and I think our nursery is the perfect space for one. 

Photobucket Pictures, Images and Photos
Le Klint 167

One reason why I chose to add the green horizontal band on the walls around the nursery (aside from thinking I might run out of paint and would use less that way) was so that we could add the wood ceiling, hardwood floors & trim/baseboards without disturbing the walls too much. I have plenty of off-white paint (used on the doors & trim) leftover to use for these future changes. Of course touch ups would be required but we can replace the new floor & ceiling finishes with minimal disturbance to the main wall colour.

So we've got new floor & ceiling finishes, trim details, area rug options and lighting to still install in the nursery to complete it. What will these new materials look like with the existing white furniture in the finished space? 

Photobucket Pictures, Images and Photos

The hardwood flooring will ground the space & provide contrast to the light ceiling & white furniture. The area rug breaks up the mass of the walnut floor and provides a stronger mix of colour & pattern in the room. It also provide a cushiness that a nursery should have underfoot. 

Currently we only have one baby but we do plan on expanding our little family with one more. Our son, who is about 18 months now, will move to the room next door to make room for baby (whenever that time comes). I  didn't use a 'theme' when designing this space because I didn't want our kid to ever 'grow out' of this room. The space is designed to reflect our child as they grow & their interests change. Artwork can be replaced, accessories can be switched, the green wall colour can easily be painted over (with no cutting in at the ceiling & baseboards), area rugs can be changed, etc....but no major overhaul to the finishes & furniture will really be needed since the space will adapt with our growing child (other than replacing the crib with a twin bed).

Photobucket Pictures, Images and Photos

And that, my friends, is the final design plan for our nursery.

Monday 6 February 2012

Our Nursery

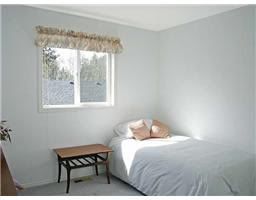
This is the first room in our house I wanted to pull together since it would mean interrupting our babe's routine in order to do so. The sooner I could get that disruption over for him the better. Following is an image of the nursery before we moved in.  It's a pretty sad 'before' picture, not only because its a low res image from the realtor, but because it was such a bland, little white box. See those white'ish walls? Yeah, that's not white paint you're looking at but what I highly suspect as primer only. For 17 years, primer only. Same goes for all the doors in this room. Primer only and it was yellowing. Not a good look especially when paired with a grey & peach window valance, cheapo horizontal slat blinds and primed only walls.

Photobucket Pictures, Images and Photos

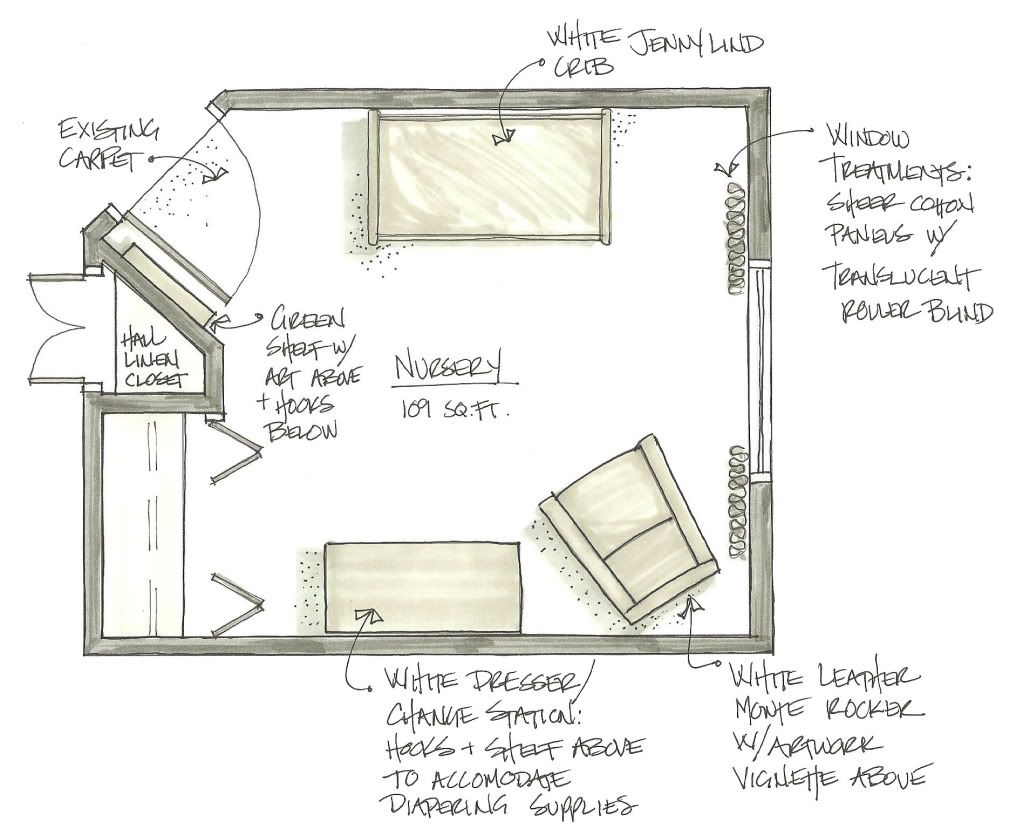
Here's a basic furniture plan of the nursery, as it is now, showing the main pieces of furniture in the space (which are all from our previous nursery).

Photobucket Pictures, Images and Photos

When I was pregnant we didn't find out what we were having, leaving it to be a surprise at the baby's delivery & we plan to do the same with our next little one. So our previous nursery needed to be gender neutral & we chose a green colour for the walls which was the 'only' colour we could both agree upon. The boy will eventually move from this nursery & go next door into his 'big boy' room to make space for a new baby brother or sister. Clarification - I'm not pregnant, just thinking ahead for when we do expand our little family. Anyways, that's my very long, over expanded explanation as to why our nursery has green painted walls.

It's a pretty boring, small room lacking in any details. Since we're trying to make changes as 'economically' (read cheaply) as possible, my only option was to use paint in the space to add some kind of interest. I already had about 3/4 of a can of green paint from our previous nursery, so I only needed to buy some off-white paint for the doors & trim. I also used some turquoise paint & another brighter green paint (that we again had used in the old nursery) in the room as accents. Those are  Martha Stewart test sample pots from Home Depot, Araucana Teal  & Bay Leaf. Each little sample pot has surprisingly gone a long way.

So here is what a little paint did to the room...

upholstered monte rocker

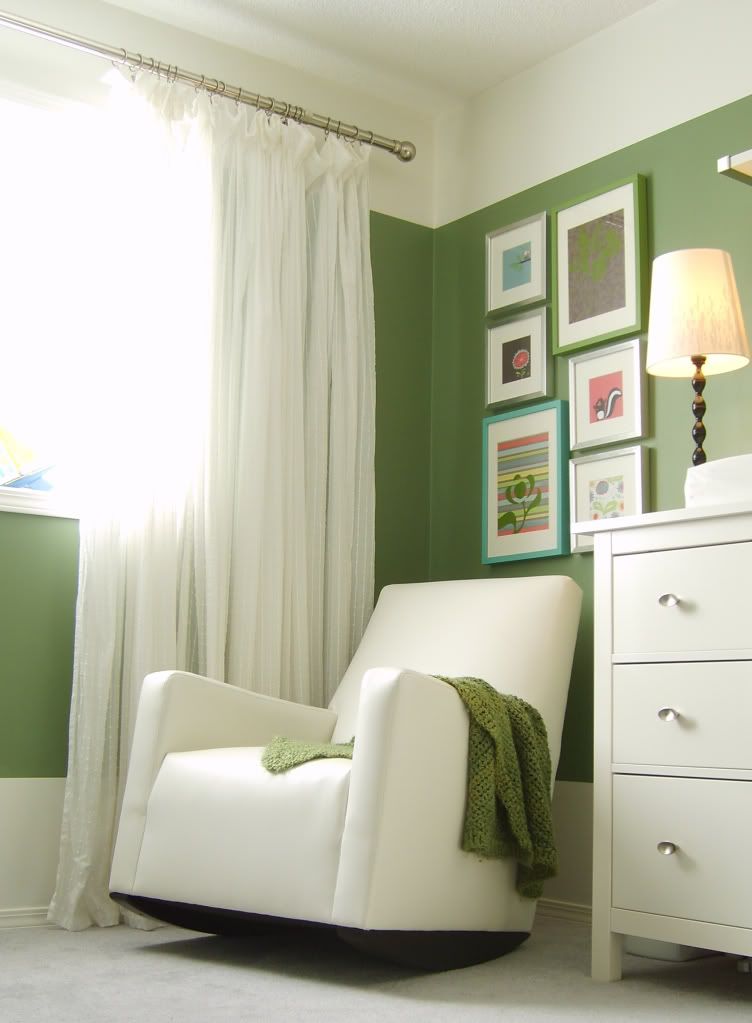
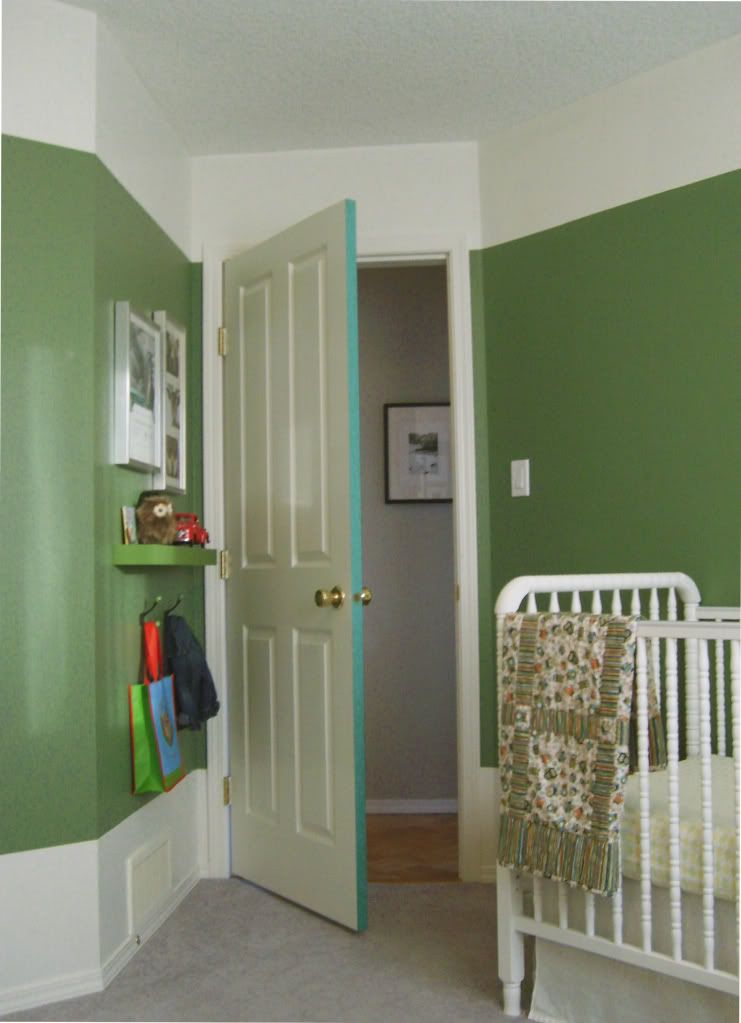
The room was a boring box so I decided to colour block the green paint on the walls. I used the same off-white paint on the doors, trim, baseboards & upper/lower walls. The green colour starts at 14" up from the floor & 14" down from the ceiling. Its painted as a horizontal band around the room breaking at the doors & window. I chose an off-white for the doors & trim, as opposed to a bright white, to soften the contrast with the darker green wall colour. The crib, dresser & rocker are all different shades of whites and I didn't want to make them look dingy by introducing a brighter white into the space.

white Jenny lind crib

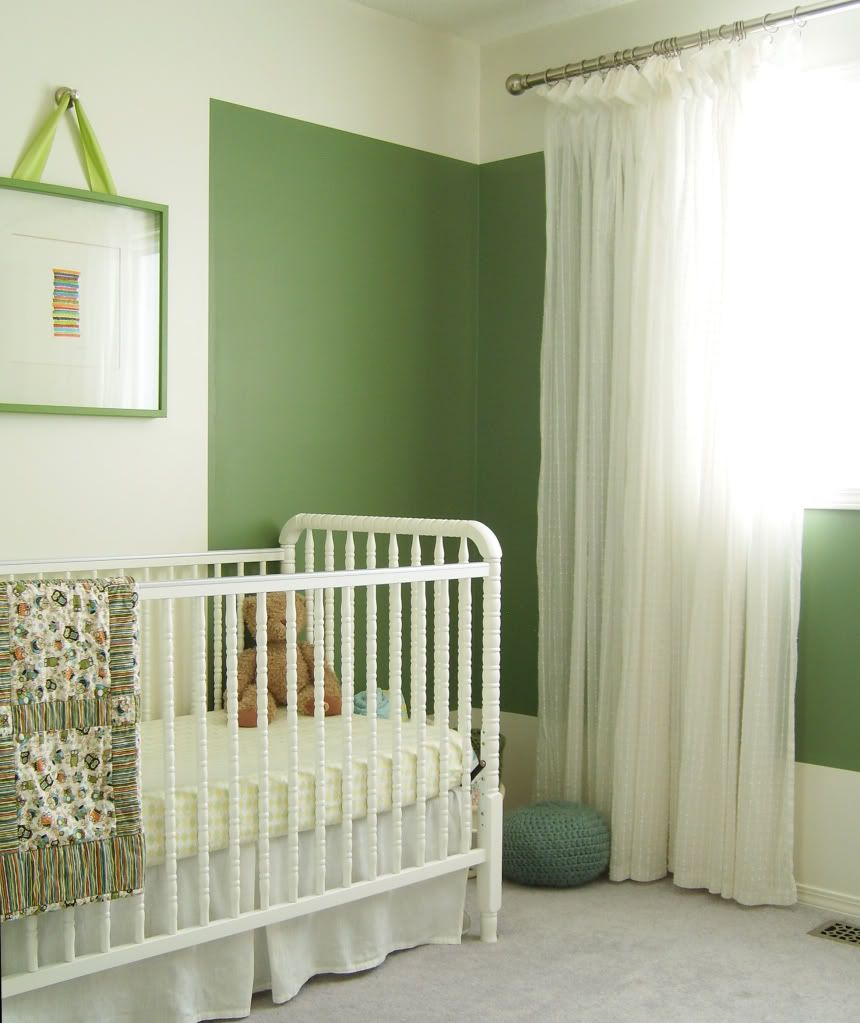
I also decided to break the green colour at the center of the crib wall to make the Jenny Lind crib & artwork above it stand out as more of a feature in the small space. It also helps balance the room by bringing a block of the off-white to that side of the room, matching the mass of the rocker & dresser. I painted an Ikea picture frame with the MS Bay Leaf and installed it above the crib.

white Jenny Lind crib

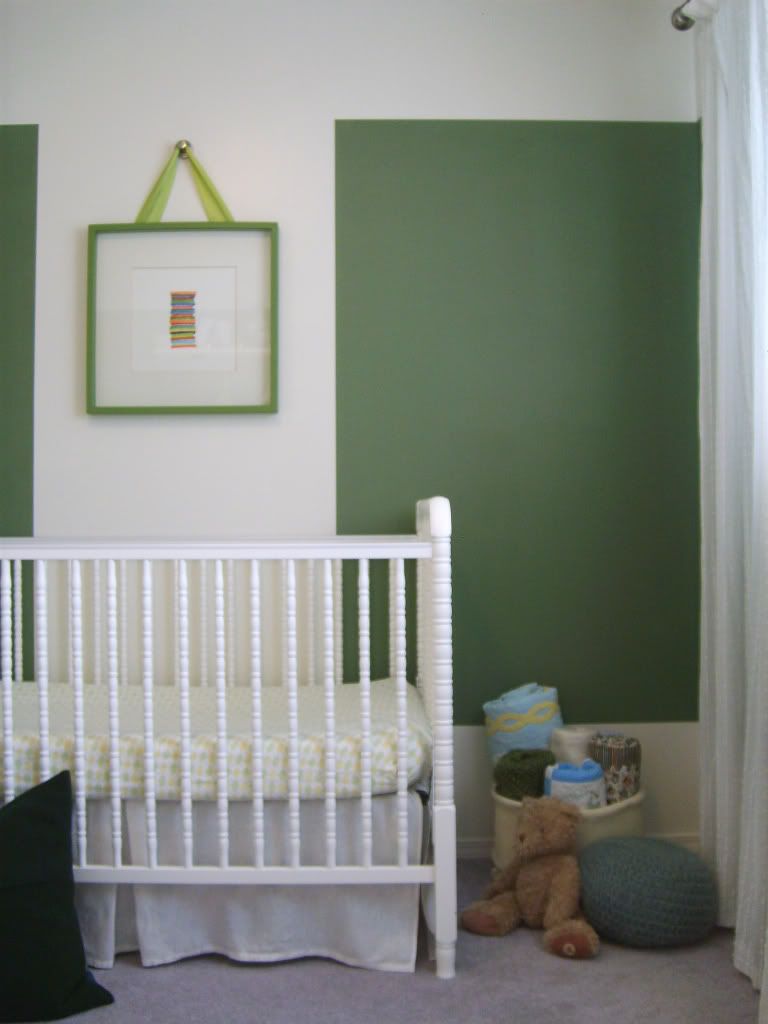
Beside the crib is a basket of quilts & blankets. Some quilts were hand sewn by my husband's grandmother for him as a baby. My mom made some of the other quilts & a felted blanket for our babe. My cousin crocheted the green blanket & the little pouf. I'm lucky that our families have sewing/quilting/crocheting talents. I wish it didn't skip me. Well, I've never actually tried, I'm just really talented in my lack of motivation sometimes.

Ikea dresser

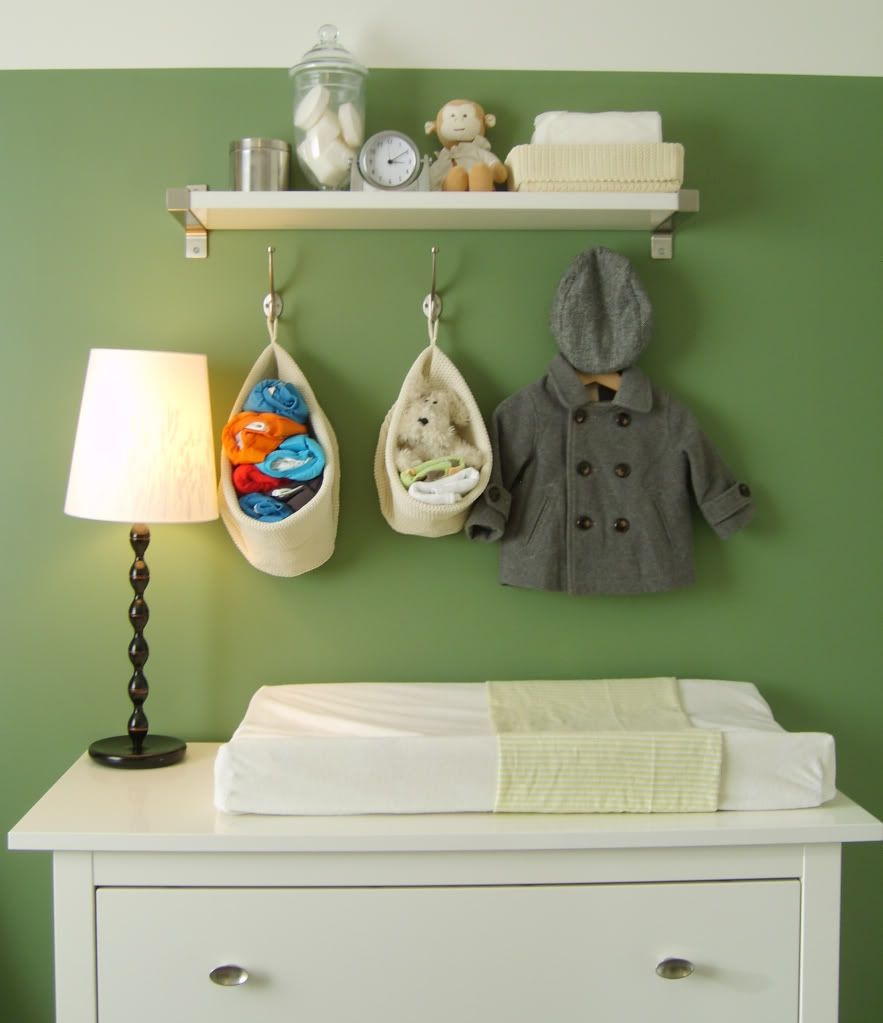
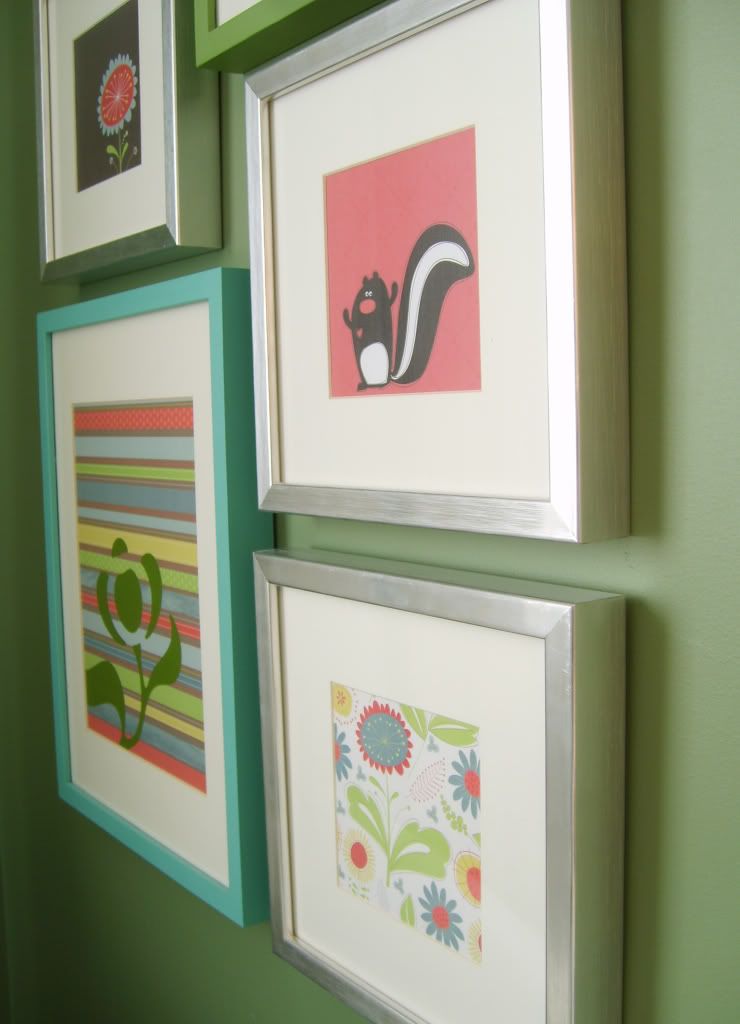
The dresser acts as a change table and the shelf & hooks hold/store all diapering items and some clothing/accessories. I love the Monte rocker with one exception: as all rockers do, it moves around. Sometimes too much but its comfortable. Very comfortable, especially when feeding &/or rocking a baby at 4:30 am. The art vignette above the rocker was made with Ikea frames & decorative paper that we had used in our previous nursery. I painted the two larger frames with the MS sample pots.

white Ikea dresser nursery art vignette Photobucket Pictures, Images and Photos

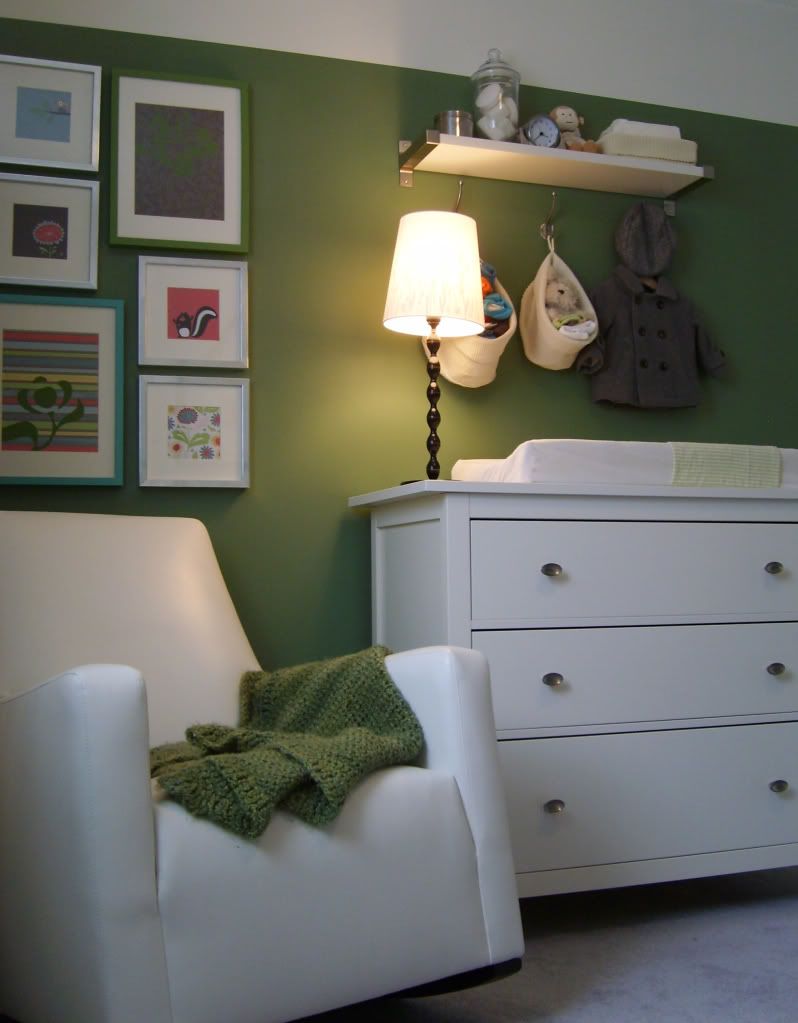
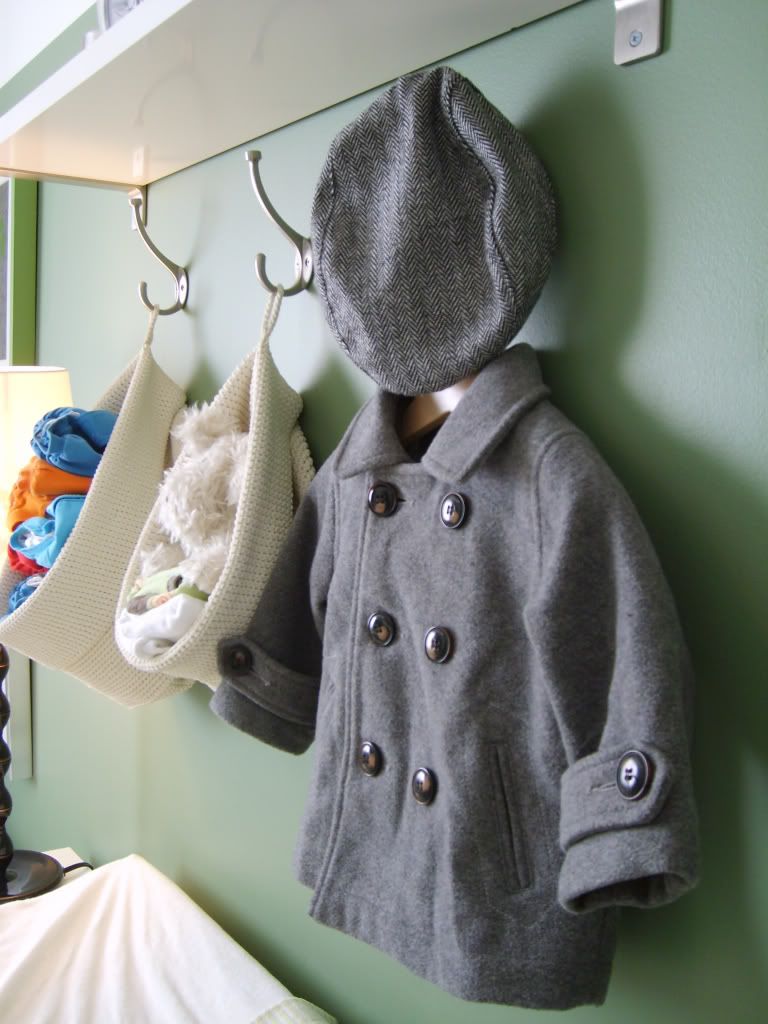
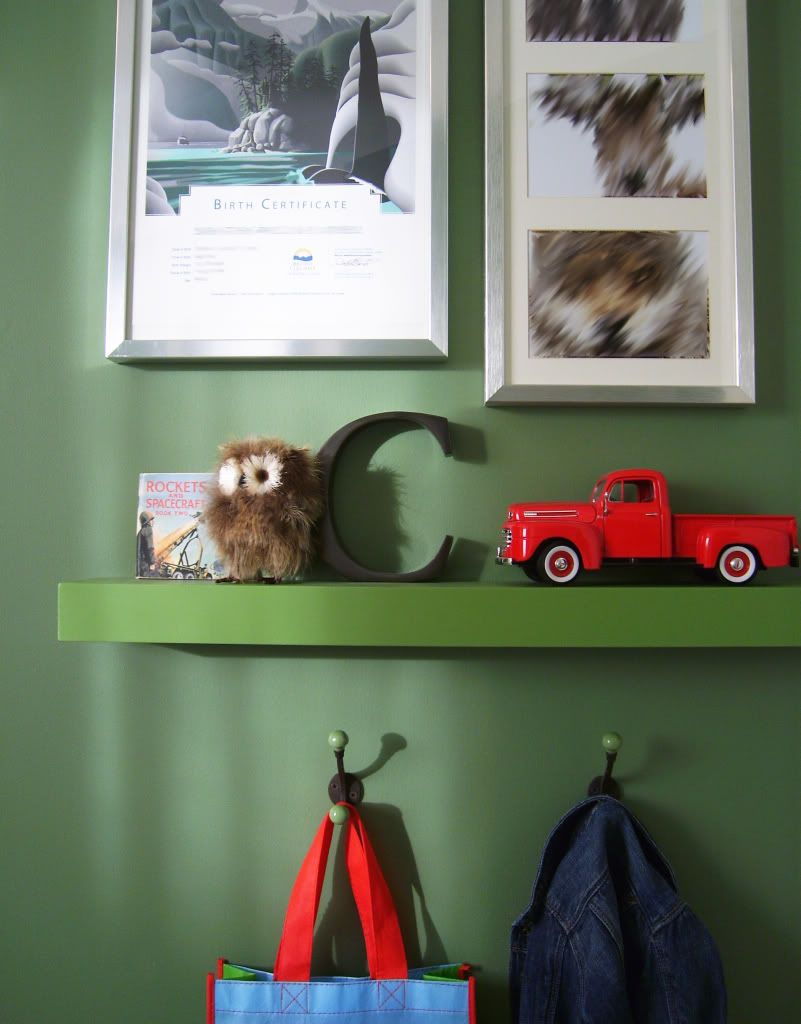
Behind the door is a floating shelf that was made for the last nursery, painted MS Bay Leaf. Above it is some art & photos and below are two hooks from Anthropologie. Since the green wall colour was chosen for a different space with different light, it is a LOT darker than I would normally select but budget, or lack of one, was a huge driving force behind design decisions here. We had it, so we used it! To try and brighten things up a bit & break the 'green-dom' of this corner, I painted only the jamb side edge of the door in MS Acuacana Teal (I saw that idea on the Lonny blog a few months ago).

gender neutral nursery Photobucket Pictures, Images and Photos

The hardware & sheer cotton drapery panels were, again, reused from the previous nursery but I added a new roller blind. I cut the Enjes blind from Ikea, to suit the window width, following this tutorial. I like how the blind filters in the natural light, as do the cotton drapery panels. Used together they're opaque enough for the little one to sleep, even on bright sunny days. The sheer white drapery panels fill this wall almost entirely when drawn closed which, again, helps to offset the darker wall colour.

nursery window treatment

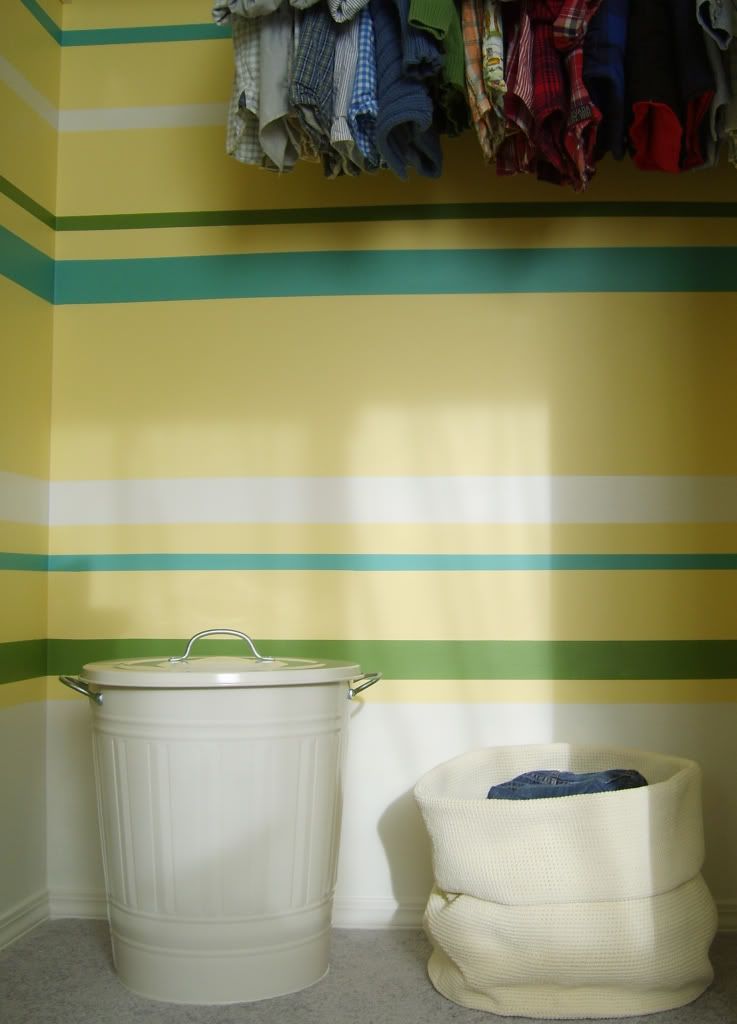
The closet. Oh the damn closet. I found a can of yellow paint in our storage room (we're not sure where it came from). It was a small can & the closet needed painting so there it went. Once it was done I realized that the combination of the green wall colour & buttery yellow was looking flat, boring, & yuck. I added off-white, green & turquoise horizontal stripes to brighten it up so I wont cringe every time I open the closet. The time involved in painting those stripes was insane. Insane! I'm glad it's done but there was some very tedious labour involved in that and I will never paint horizontal stripes inside a closet again.

kid closet Photobucket Pictures, Images and Photos

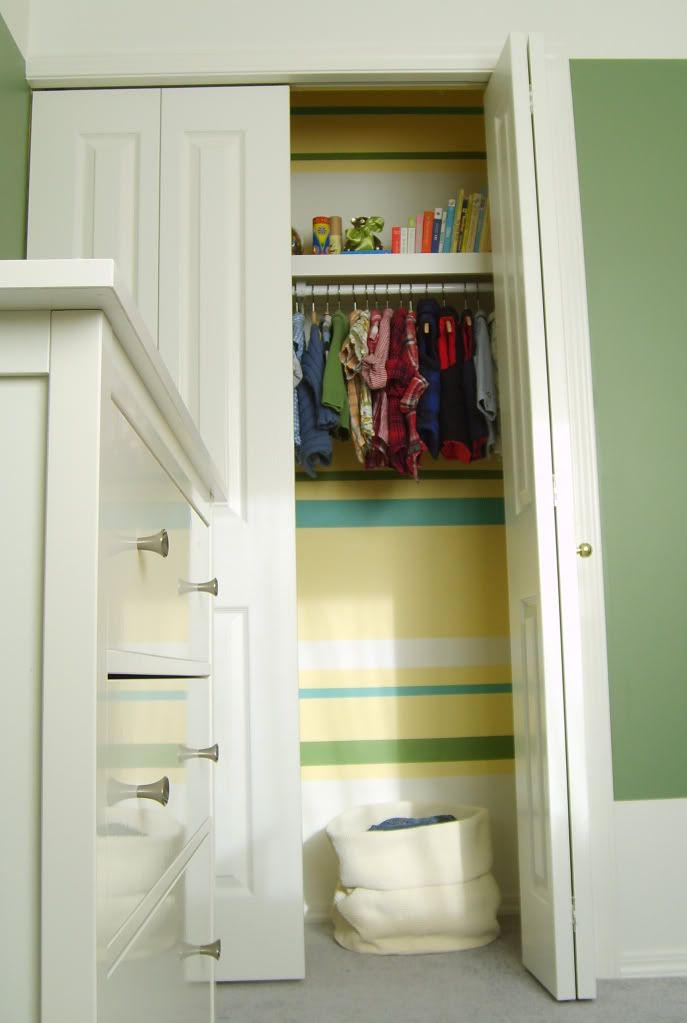
The closet rod, shelf & hardware were already there and installing nicer rods & hardware in a baby's closet is not very high on my priority list.  I'd like to add a shallower shelf above the existing one at some point, to maximize the vertical storage. I thought of adding another rod below to double the hanging space but there's enough clothing storage between the dresser & existing closet rod. I'd rather keep the bottom half more open as it is since our little guy likes to use the closet as a hiding space (hide-and-go-seek) & building forts.

Photobucket Pictures, Images and Photos

The existing grey carpet is here to stay for a while. My design resolution with it was basically just to ignore it. It's neutral enough that it doesn't clash with anything but I'm still keeping my eye out for a large flat weave area rug to layer over it. I bought a cheap ass light fixture for the ceiling. An Ikea hemma cord (in blue) with the round paper lantern shade. But then the paper shade ripped which is okay since I felt 'meh' about it anyways. I've got an idea to create a new shade and if it turns out to be too 'crafty' or d.i.y. looking, I'll just leave the boring 'builder special' fixture up until I buy a light that i really want.

kid wood chair

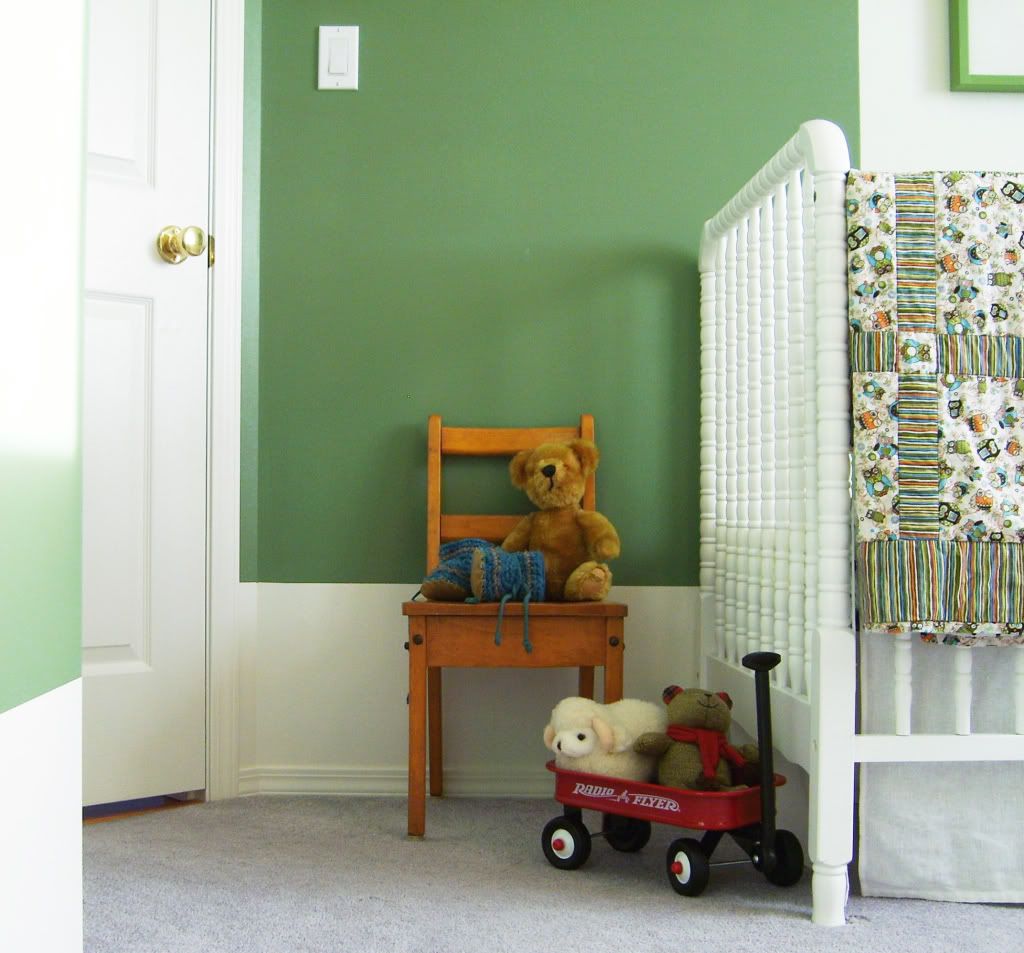
This little wood chair was gifted to us from my mother-in-law. She rescued it from my husband's elementary school years ago as it was being tossed in the trash. It's a great solid little seat. 

Photobucket Pictures, Images and Photos

I love, love, love these booties. They're knitted wool with sheepskin soles. Nice, warm & cozy on the inside with a non-slip suede bottom. They are too cute on little feet and I think every baby should have a pair.

So thats our nursery. It only cost us the price for one gallon of off-white paint, a roller blind, two hooks and a hella lot of my time & labour. But our little one loves it so I'm happy with that.

P.S. I'm working with just a little Samsung point & click camera so please excuse the quality of the photos. No fancy camera with a crazy lens here.

Follow my blog with Bloglovin